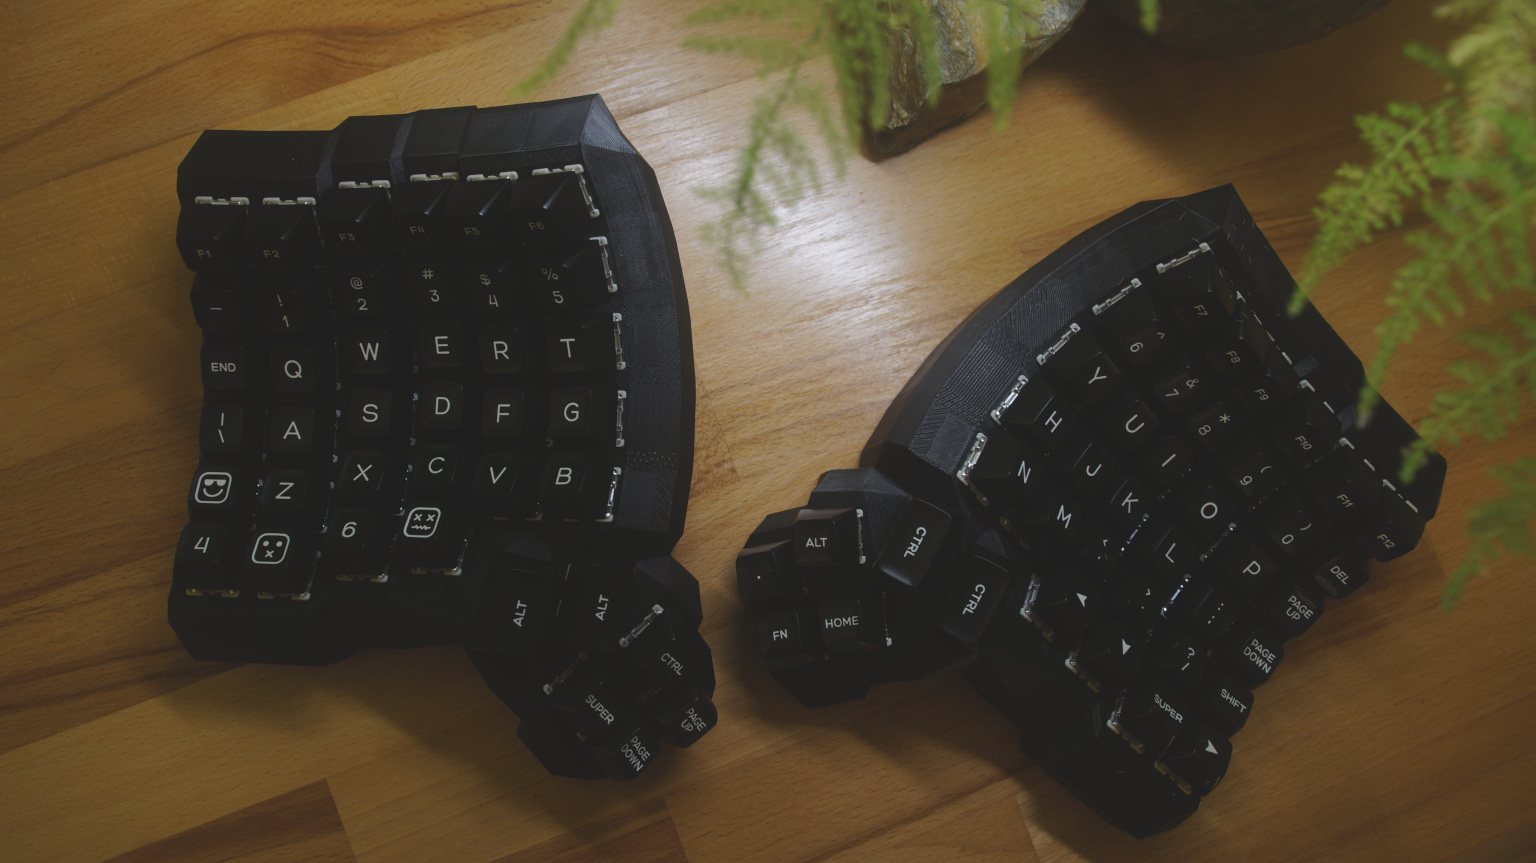
The Dactyl Manuform is a DIY ortholinear split keyboard with a keywell. Here’s my experience building and using it for one year.
Design Choices and How They Feel
Split
As the name suggests, it splits the keyboard in half as shown in the image below.
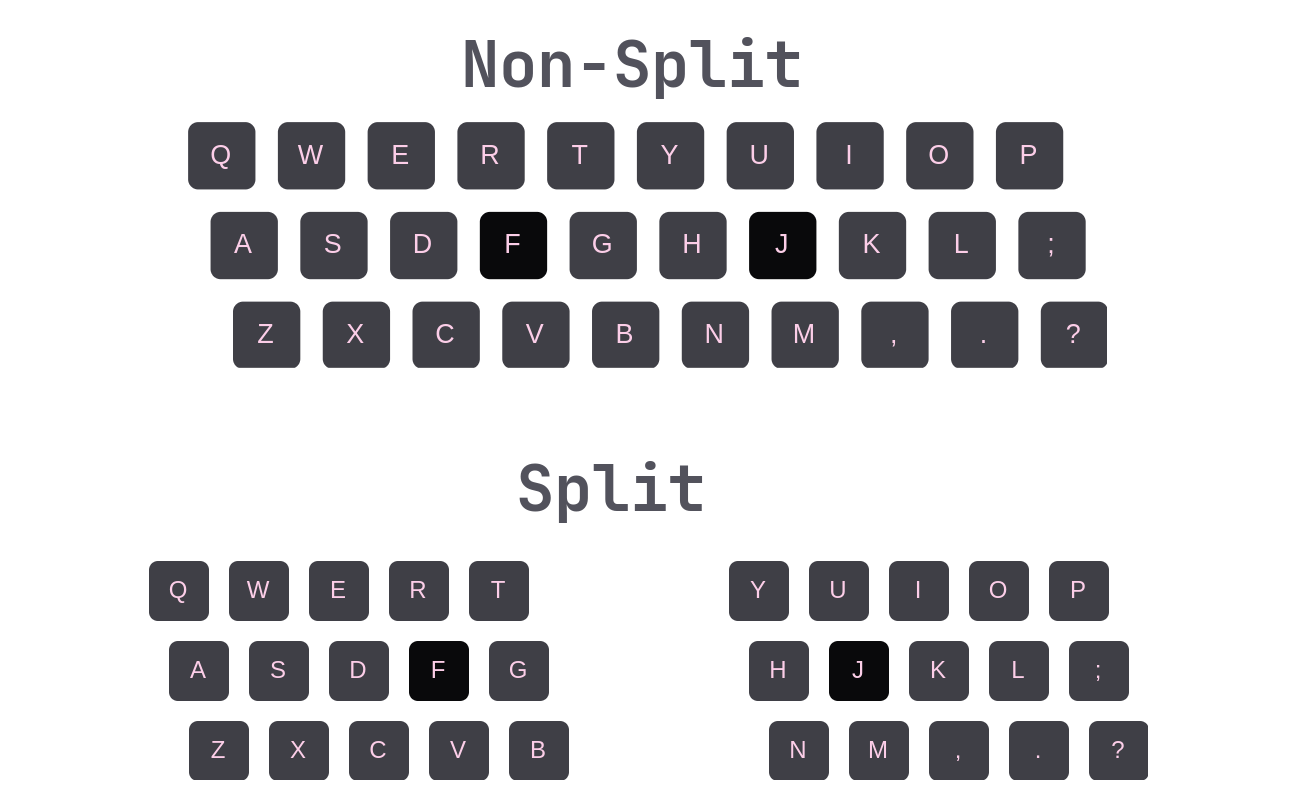
This makes it possible to position each keyboard half where it feels most comfortable. The ideal is to place the halves about shoulder width apart to allow for an open shoulder and back position. This also promotes a more natural wrist position, since you no longer need to bend your wrists inwards.
This is generally understood as the biggest selling point of a split keyboard.
Ortholinear
Traditional keyboards have a staggered key arrangement, meaning the keys are not vertically aligned (see image below).
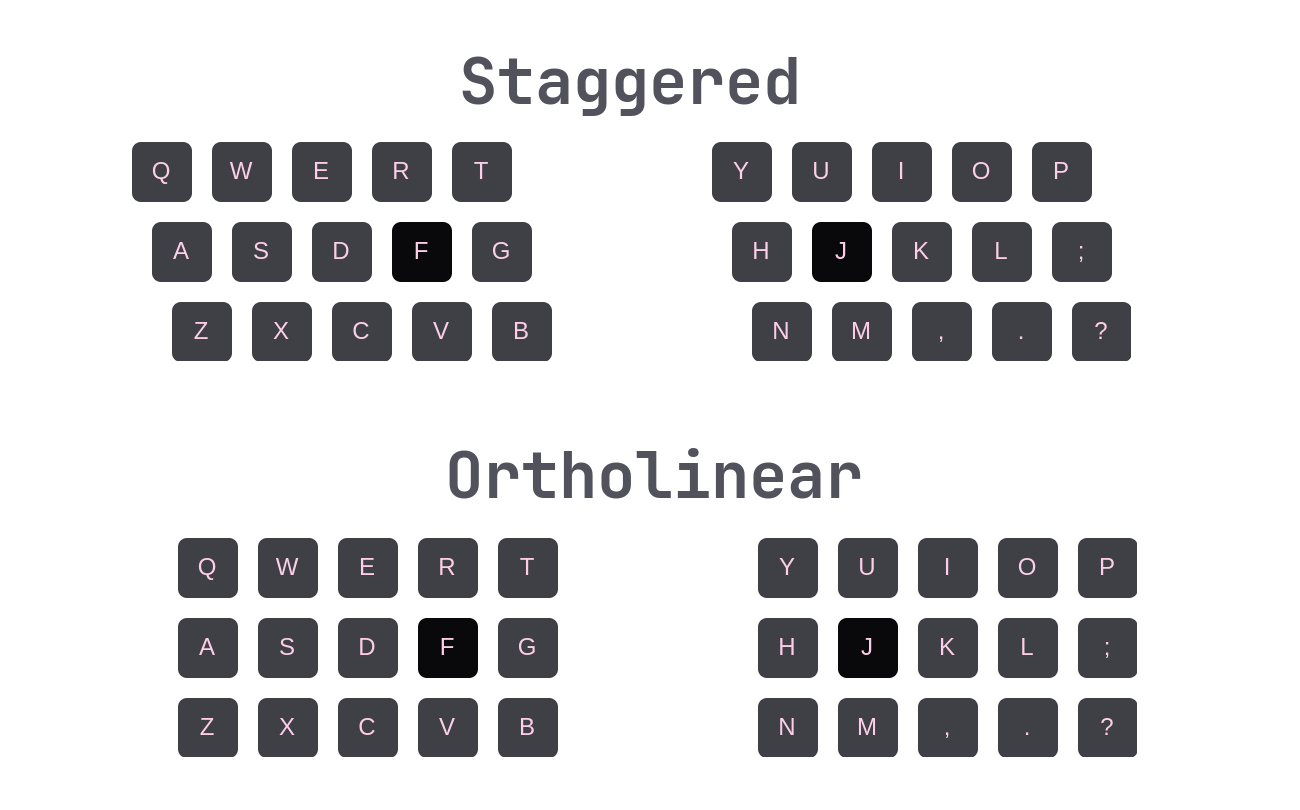
This forces unnecessary side-to-side motion when typing across rows. An ortholinear keyboard eliminates that extra effort, letting your fingers travel straight up and down without these micro side-to-side motions.
Note: Ortholinear really only makes sense on split keyboards. On a non-split ortholinear keyboard, you’d need to bend your wrists heavily to keep your fingers moving straight up and down.
Keywell
Some people dismiss the keywell as a gimmick, likely because they haven’t typed on a keyboard with one, but it isn’t. Even if you haven’t fully learned to type on it, you’ll notice the difference. The distance your fingers need to move from one row to the next is smaller, and the change in motion is less noticeable or even nonexistent.
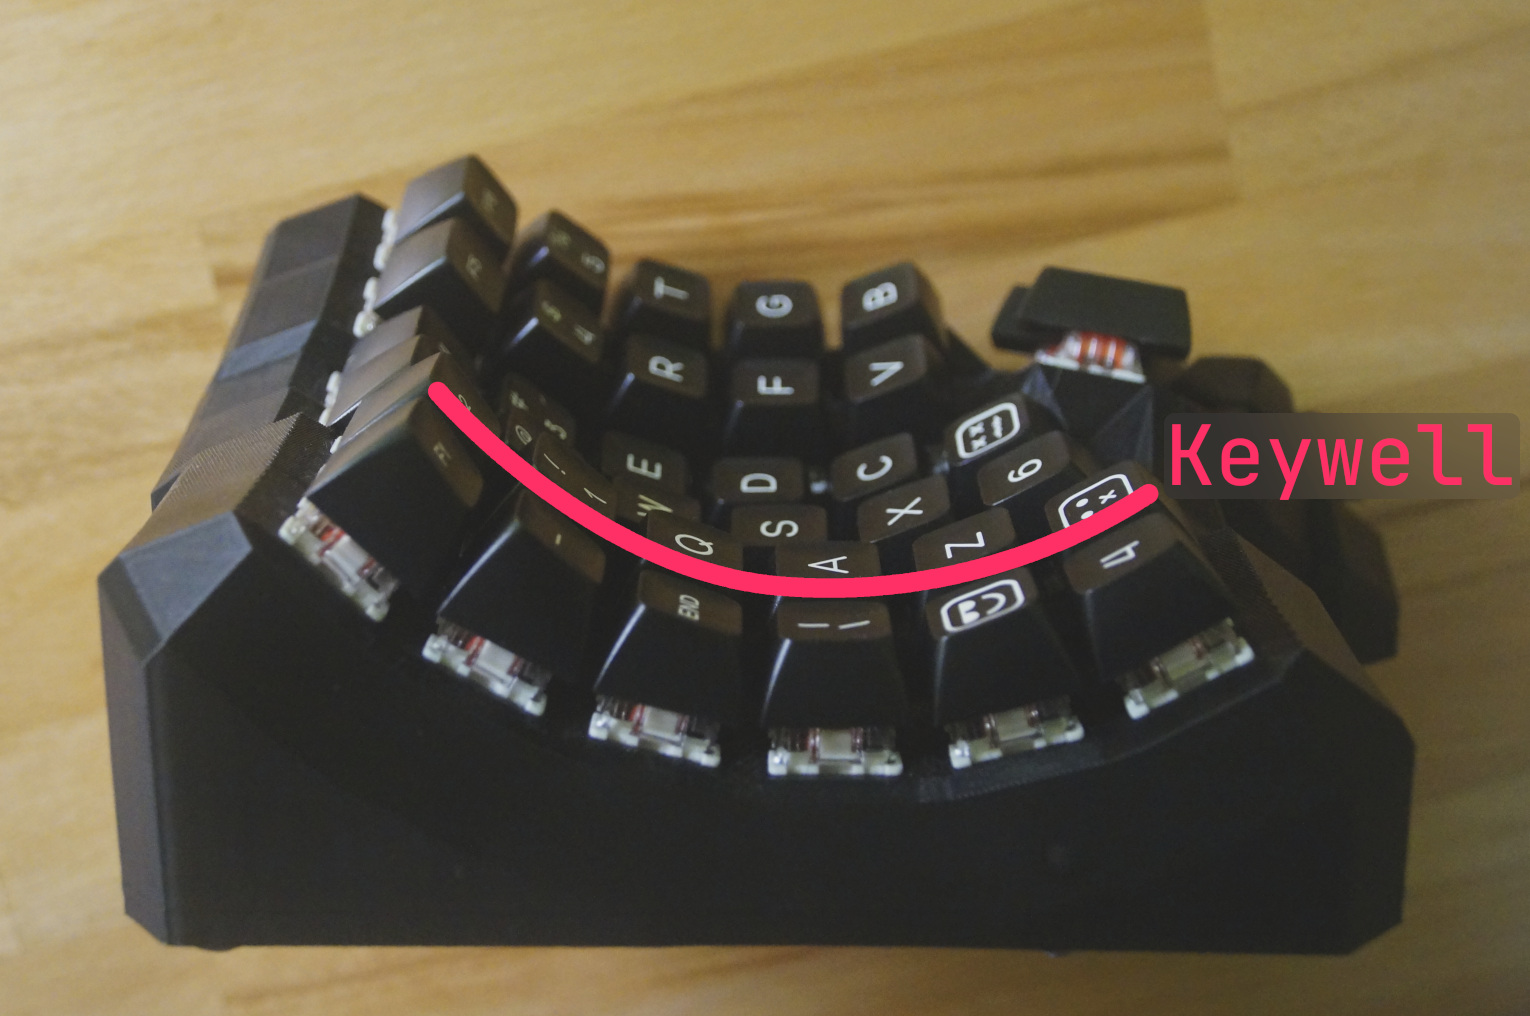
For example, on a traditional keyboard, moving your finger from the home row, which is where your fingers naturally rest on the F and J keys, to the row above (R3) requires first moving forward and then changing to a downward motion. On a keyboard with a keywell, these motions combine: pressing a key one row above the home row is mainly about moving your finger forward, without changing to a full on downward movement.
Additionally, the columns have different heights. For example, the pinky row sits higher than the ring finger to compensate for it being shorter than the other fingers. The columns also shift slightly forward or backward depending on the corresponding finger which adds to typing comfort.
Thumb Cluster
I can only share my opinion about the default six-key thumb cluster, as there are different variations and this is the only one I’ve personally used. My observations may not apply to other designs. One thing all thumb clusters have in common, however, is that they are not flat. Instead, the cluster slopes inward as shown here:
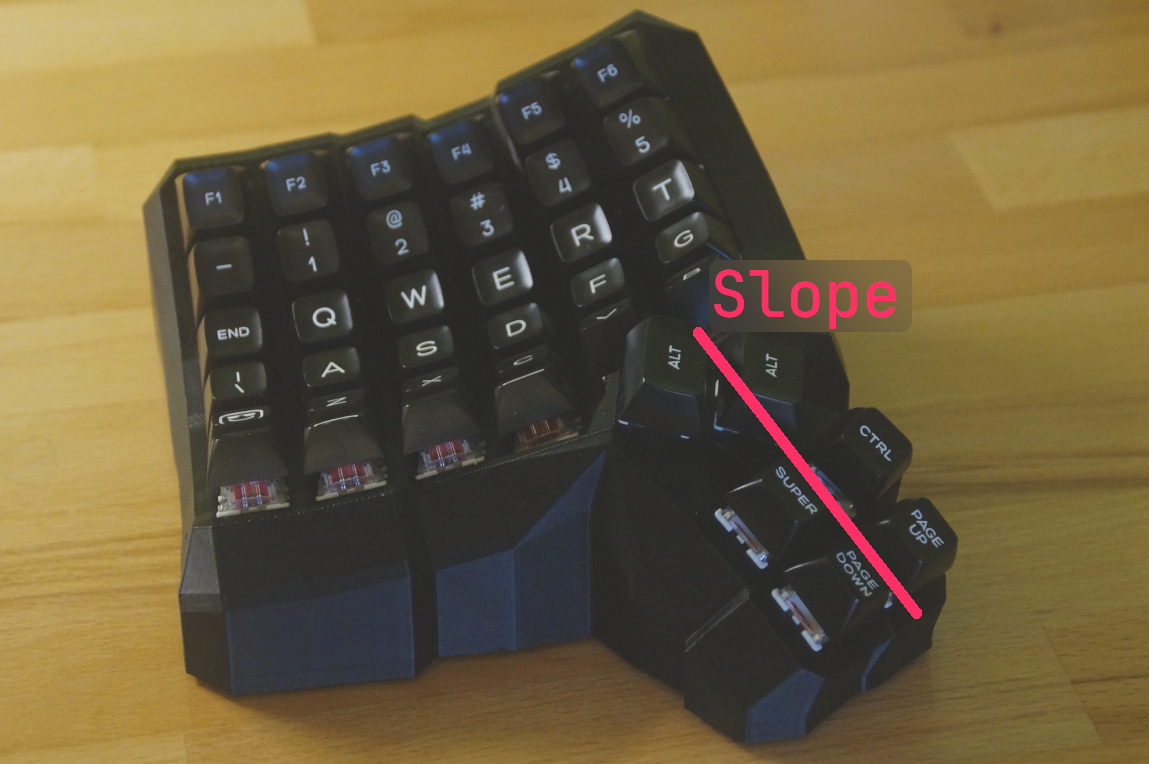
So you press the keys not only with the side of your thumb but also partially with the thumb pad. The motion becomes more of a grabbing motion rather than a downward slap.
This design is particularly nice when typing with floating hands, as it allows pressing keys from different angles. However, it can be slightly more difficult to use with a palm rest.
Personally, I am not a big fan of the default cluster because of the placement of the two primary keys. Neither key is in a comfortable spot to serve as a primary action key, like the space bar. The ideal position would be between the two.
In fairness, this problem can be avoided by choosing a different thumb cluster or by manually adjusting the thumb key positions in the configurator. But more on that later.
Tenting
Tenting means your keyboard is not sitting flat on the table. Instead, each keyboard half is slightly elevated on the inside, allowing you to type with your hands in a slightly outward-rotated position.
This is also the natural resting position of your hands, which you can observe by standing up straight and letting your arms hang relaxed at your sides. Your palms will not face fully backward.
There are a few ways to achieve tenting. The simplest method is to place books under the inside of each half. More luxurious options include using stands with MagSafe mounts to hold your keyboard halves and tilt them, or even using clamps designed for cameras. The community is fairly creative with these solutions.
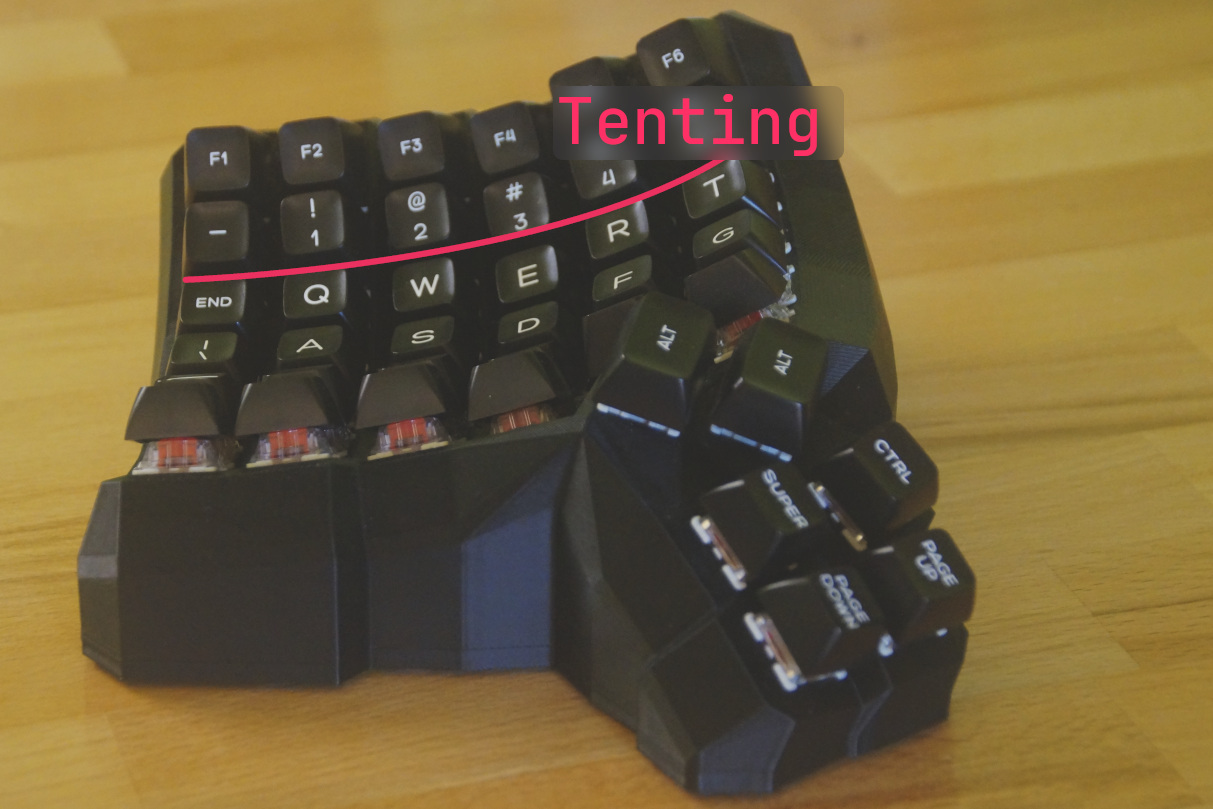
The Dactyl-Manuform, however, comes with some degree of tenting already built in, which you can adjust to your liking when designing your own case.
Build
Creating a Dactyl-Manuform is a very labor intensive undertaking compared to keyboards built using a PCB as a base, such as the Ferris Sweep. Therefore, it’s important to determine beforehand whether the effort is worth it. If not, there are plenty of sellers on AliExpress or Etsy who offer prebuilt ones.
Case
You can find ready-to-go Dactyl-Manuform cases on major 3D model sharing platforms, such as Printables or Makerworld. However, using these models does not align with the spirit of the Dactyl-Manuform.
The Dactyl-Manuform features a parametric design, allowing you to adjust parameters to modify aspects like tenting angle, keywell curvature, or thumb cluster layout. This is done using a configurator.
Configurator
The popular choice today is the Cosmos Keyboard Generator. Compared to other configurators, Cosmos is relatively easy to use through its website interface, without requiring a local build environment. It also includes good documentation for building your own Dactyl-Manuform.
Another option, which I chose, is one of the locally based Python Generators. But if you are not familiar with programming, these can be cumbersome. Back then, I chose the Python-based generator because it offered better edge placement, which looked more visually pleasing. Cosmos has improved since then and is probably the better choice now.
Printing
Since the Dactyl-Manuform is meant to be customized to one’s personal needs, you will need to 3D print the case. It’s best to own a capable 3D printer so you can experiment with different designs. I personally use the BambuLab A1 and highly recommend it. Alternatively, you can use an online 3D printing service such as JLC, though I have no personal experience with their printing service.
Parts You Need
- 1x Right Case / 1x Left Case: Most cases are printed in PLA, as is mine. Some fancier ones are printed in resin or even nylon.
- 2x MCU Holders: Different cases require different designs, and different MCUs may need slightly different holders.
- Switches: The number of switches depends on the form factor of the Dactyl-Manuform case you chose. For me, it was 80 switches. Usually MX-style switches are preferred, though if your case supports it, other switches like Kailh Choc are possible.
- Keycaps: Same number as switches. SA-profile keycaps are commonly used to complement the keywell.
- 2x MCUs: Pro Micro RP2040 is preferred over the ATmega32U because it has more flash memory, although my build uses the ATmega32U.
- 2x TRS Jacks: You can also use TRRS, but you must ensure you solder to the same contacts on each side.
- Diodes: One per switch.
- ~3m Single Copper Wire (insulated): I used 26AWG wire, which was easy to work with.
- 2x Reset Switches: You won’t necessarily need these, since you can map a keybind to reset (enter bootloader) in your firmware. However, they are useful when needed, as they are easily accessible.
- Brass Hot Melt Insert Nuts: These go into the case to secure the bottom plate. Their size depends on the case screw hole size.
- Screws: Ones that fit into your brass inserts.
Tools
- Wire Stripper (recommended): Saves a lot of time by making insulation removal very easy.
- Soldering Iron: An absolute must have. If possible, also get heat insert tips for the brass inserts.
- Multimeter (recommended): Used to check for a connection between two points, helping to identify potential errors later.
Assembly Overview
There are plenty of build guides available. Some popular and well written ones include:
- Nick Green’s Dactyl-Manuform Build Log
- Medium: Complete Idiot’s Guide for Building a Dactyl-Manuform Keyboard
These guides include wiring diagrams, part lists, and detailed explanations. With those resources available, I will outline the general steps and potential difficulties rather than describing the process in meticulous detail.
Installing the Switches
If you are not using hot-swap sockets, it is recommended to glue the switches in place.
If the switches are not seated firmly in their slots, there’s a good chance that when you later change the keycaps, you might pull the switch out and damage the wiring. Hot glue is a solid choice for securing the switches.
Wiring the Keyboard Matrix
Patience is key here, as you will spend a substantial amount of time soldering. It probably took me somewhere between 10–15 hours cutting, stripping, bending, and realigning wires.
The goal is to create a matrix consisting of wires (columns) and diodes (rows), as shown in the image below. This is necessary because there are too many keys to wire each switch directly to an MCU pin.

Aside from running out of patience, the main thing to watch for is the diode orientation. Getting it wrong will prevent the keyboard from functioning correctly.
Connecting to the MCU
Instead of soldering directly to the MCU, it is recommended to use a connector, such as a DuPont connector. In case of an MCU failure, you can easily unplug the faulty MCU instead of having to desolder it.
Flashing
Before installing the MCU, it’s best to flash it first. If the MCU does not flash, it is most likely defective and should be replaced.
My setup is wired, so it runs QMK. If you are using Linux, the QMK setup process should be fairly smooth, provided you are familiar with:
- Git
- GitHub
- Linux CLI
In that case, following the QMK documentation to set up your environment should not pose a major challenge. Just make sure to create the necessary udev rule, otherwise you will not be able to flash your device.
Takeaways and Improvements
The Dactyl-Manuform is a very nice keyboard to type on, thanks to the features discussed earlier in this article. I also think it is worth the effort (the total build took me around 20 hours) if what you seek is a superior typing experience.
However, there are a few things I would do differently now:
- Rearrange the thumb cluster.
- Make the switches hot-swappable by using single PCBs.
Therefore, one needs to take the time to adjust the keyboard to one’s ergonomic needs, because that is what the Dactyl-Manuform was truly meant for.
If you have any questions or suggestions, feel free to use the comment section below.
Stats you might find interesting: This article was typed on:
- 40% on a Svalboard
- 30% on a Dactyl-Manuform
- 20% on a Zuoya GMK 67
- 10% on a Ferris Sweep
Comments are powered by Giscus, which may load third-party cookies. By clicking "Load Comments", you agree to GitHub's Privacy Policy.